llmexer
🔰About


llmexer is a CLI tool for LLM experiments. Use it to build datasets (publications, metadata, prompts) and to design, run and evaluate experiments on them.
🪄 The idea behind the tool:
everythingis afile. Projects, experiments, searches, and configs are all stored as files. The CLI edits them for you, but you can also edit them manually. Anything could be changed or viewed via the files—a model name, a search string, a new PDF, or the generated SQLite database.
💎 Core features
- Easy start:
llmexeris a Python package that can be installed and run anywhere. - Transparency: each project keeps related files in one folder (e.g., experiments, papers, searches, analysis, etc.) using plain formats (CSV, text, SQLite). Add these files to git and track progress and retain history.
- Literature search and papers: search Semantic Scholar and OpenAlex, download papers by DOI, extract text from PDFs as markdown.
- Experiment design: combine data with custom and configurable LLM prompts, LLM models and LLM parameter into one reproducible experiment.
- Multiple LLM providers: run the same experiment using different LLMs (supports:
ollama,vLLM,LiteLLM,OpenAI, andOpenRouter). - Controlled runs: run experiment in parallel to save time, test prompts using
experiment tryto find a proper prompt, add new LLM configurations ad-hoc. - Results and export: view stats per model and provider, export search and experiment results to HTML reports for ad-hoc analysis.
- Analysis: generate Jupyter notebooks using pre-defined templates. It help with analysis of search and LLM experiments (e.g., measure agreement between LLMs with Cohen’s kappa).
✨ Early beta warning
The package is in early beta. Breaking changes may arrive at short notice.
📦 Installation
Install with pip:
pip install --upgrade llmexer
Install with uv:
uv pip install --upgrade llmexer
Then set up your configuration, as described below.
🏁 Documentation
The current readme is used as documentation.
🔗 Tutorials and articles
⚙️ Configuration
llmexer needs access to a local or remote LLM. It reads your credentials and your current project from a .env file.
Create a .env file in the project root and add the settings you need. All of them are optional.
Current project
PROJECT_ID=20260330-3a9adf70
To use a different set of variables for one run, pass your own file:
llmexer --env-file custom.env
🪸 .env Configurations
Every variable below is optional unless marked required.
Provider category: ollama
| NAME | Default | Explanation |
|---|---|---|
PROVIDER_OLLAMA_URL |
http://localhost:11434/v1 |
Base URL of the local Ollama server. |
Provider category: vllm
| NAME | Default | Explanation |
|---|---|---|
PROVIDER_VLLM_URL |
http://localhost:8000/v1 |
Base URL of the local vLLM server. |
Provider category: openai
| NAME | Default | Explanation |
|---|---|---|
PROVIDER_OPENAI_URL |
none — required | Route the openai provider from anywhere. |
PROVIDER_OPENAI_KEY |
na placeholder |
API key for the openai provider. |
Provider category: gemini
| NAME | Default | Explanation |
|---|---|---|
PROVIDER_GEMINI_URL |
https://generativelanguage.googleapis.com/v1beta/openai/ |
Gemini’s OpenAI-compatible endpoint |
PROVIDER_GEMINI_KEY |
na placeholder |
API key for the gemini provider. |
Provider category: litellm
| NAME | Default | Explanation |
|---|---|---|
PROVIDER_LITELLM_URL |
none — required | LiteLLM proxy endpoint |
PROVIDER_LITELLM_KEY |
none — required | The proxy always authenticates |
Provider category: openrouter
| NAME | Default | Explanation |
|---|---|---|
PROVIDER_OPENROUTER_URL |
https://openrouter.ai/api/v1 |
OpenRouter gateway, which fronts many upstream providers behind one endpoint |
PROVIDER_OPENROUTER_KEY |
none — required | The gateway always authenticates |
PROVIDER_OPENROUTER_MAX_SPEND |
5.0 (USD) |
Ceiling on what one experiment run may spend through OpenRouter. Re-run will reset budget counter, so it caps per run/session, not cumulative. |
Provider variables follow one naming rule: PROVIDER_<PROVIDER-NAME>_URL or PROVIDER_<PROVIDER-NAME>_KEY (<PROVIDER-NAME> is the provider in uppercaseOLLAMA, VLLM, LITELLM, OPENAI, GEMINI or OPENROUTER).
Category: search
| NAME | Default | Explanation |
|---|---|---|
OPENALEX_API_KEY |
unset | Enables OpenAlex as a second source in search run, after Semantic Scholar. Unset, OpenAlex is skipped. |
MAX_OPEN_ALEX_RESPONSES |
5000 |
Cap on the works processed per OpenAlex query. |
UNPAYWALL_EMAIL |
llmexer.openalex@local.local |
Contact address for DOI downloads via Unpaywall, and the OpenAlex polite-pool mailto. |
Category: docling
| NAME | Default | Explanation |
|---|---|---|
DOCLING_URL |
http://localhost:5001/ |
Remote docling-serve used by papers extract --processor docling. |
DOCLING_USER |
empty | Username for the docling server. |
DOCLING_PASSWORD |
empty | Password for the docling server. |
Category: CLI
| NAME | Default | Explanation |
|---|---|---|
LLMEXER_BASEDIR |
the current directory | Where the CLI writes .projects/, temp/ and llmexer.log. |
🚀 Getting started
This is the usual path from an empty project to analysed results.
1. Create a project
llmexer project create
2. Give it a meaningful name
llmexer project rename --old-id 20260402-a1b2c3d4 --new-id llm-survey-2026
3. Set up the project structure
This creates an experiment/ folder with template CSVs and a starter prompt:
llmexer experiment init --pid llm-survey-2026
| File | What it holds |
|---|---|
experiment/llms-for-experiment.csv |
The models to test. One row is one model run under one profile, so list a model twice to run it under two profiles. |
experiment/data.csv |
Your input rows. |
experiment/mapping.csv |
Which prompt each data row uses. |
experiment/llm-params.csv |
Hyperparameter profiles, keyed by provider, model and profile name. |
experiment/prompts/prompt01.txt |
A starter Jinja2 prompt template using and. |
4. Build the experiment database
First fill in the CSVs and write your prompt templates. Then pair the data rows with the prompts you want:
llmexer experiment map --pid llm-survey-2026 --prompt prompt01,prompt02
map is optional, and most useful after experiment copy-papers or experiment copy-search has replaced your data.csv. It pairs every data row with every prompt you select and backs up the old mapping.csv.
Now generate the experiments:
llmexer experiment generate --pid llm-survey-2026
generate renders every combination of data row, prompt, model and parameter profile, then writes them to a SQLite database in experiment/. Models and profiles are matched on provider, model name and profile name. Each of those combinations must be unique in each CSV; if one is repeated, generate reports it and stops. A model with no matching profile is reported and skipped.
Add --dry-run to see how many rows you would get, without writing anything:
llmexer --dry-run experiment generate --pid llm-survey-2026
💡 Hint: the experiment store is a plain SQLite database (
experiment/experiment_*.db), so you can also open and edit it in a tool such as DBeaver. Each provider has anexperiment_<provider>table for the rows and aparams_<provider>table for the hyperparameters. Join them to see each row next to the parameters it ran with:SELECT e.*, p.* FROM experiment_ollama e JOIN params_ollama p ON e.params_code = p.params_code AND e.profile_name = p.profile_name;
5. Add later combinations to the database (optional)
If you add a model, a profile or a few mapping rows after generating, update appends what is missing instead of starting a new database:
llmexer experiment update --pid llm-survey-2026
Stored rows and the results already collected for them are never touched.
Hyperparameters are never rewritten either. If a profile keeps its name but has different values, update reports the differences and stops — otherwise you could not tell rows generated before the change from rows generated after it. Give the changed parameters a new profile name, point the model row at it, and run update again. A changed prompt or data cell is only reported as a warning, and the stored rows keep the text they were generated with.
6. Try one combination (optional)
Before running everything, check what one prompt returns for one data row under one profile:
llmexer experiment try --pid llm-survey-2026 \
  --prompt prompt01 --profile ollama-default --data-id D01
try is generate and run for a single combination. It checks all three names first, so a typo stops the command before any LLM call. The model and provider come from the profile; if one profile name covers several models, try lists them and asks you to add --model or --provider. Every try is kept as history in the database, together with the parameters it used, and leaves your generated rows and their results alone. A project that has not been generated yet has no database to keep it in: the try then warns, runs anyway and saves only the response file.
Not sure what to try? --suggest picks a data row, a prompt and a model at random from data.csv, prompts/ and llms-for-experiment.csv, and prints the command for that combination without running it:
llmexer experiment try --pid my-project --suggest
Add --dry-run to print the rendered prompt without calling anything.
7. Run the experiment
Call the LLMs and collect the results:
llmexer experiment run --pid llm-survey-2026 --file experiment_<SAMPLE>.db
Results are written back into the same database, so it stays your single source of truth. Each call is also saved as a JSON file in experiment/responses/. If you run the command again, rows that already finished successfully are skipped.
Scenario 4 covers the rest of the options: previewing a run, narrowing it to one provider, model or profile, running a single row, and running several calls at once.
8. Check the statistics
llmexer experiment stats --pid llm-survey-2026
You get totals, token counts, and a breakdown per provider and per model. If the project holds several databases, pass --file to choose one:
llmexer experiment stats --pid llm-survey-2026 --file experiment_<SAMPLE>.db
9. Export the results as HTML (optional)
This renders the experiment as one self-contained page, which is handy for screening or sharing:
llmexer experiment export --pid llm-survey-2026 --file experiment_<SAMPLE>.db
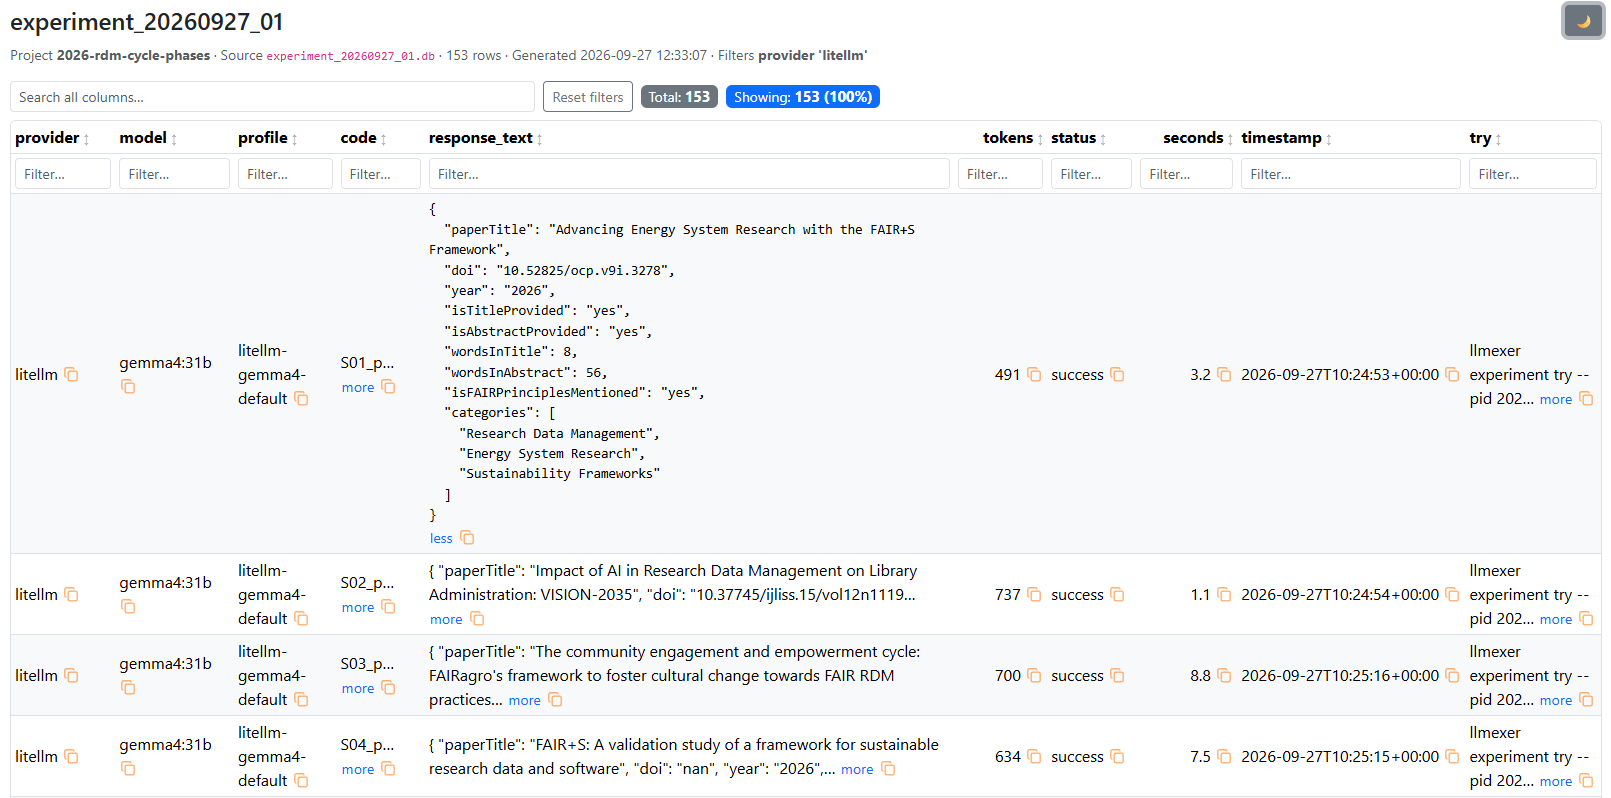
The page has sortable columns, per-column filters and a copy button on every cell. Each row also carries a ready-to-run experiment try command, so you can copy a cell and re-run that single combination in a shell.
You can also export part of a database, with the same filters experiment run takes:
llmexer experiment export --pid llm-survey-2026 --filter-provider ollama
Two more filters belong to the export alone and match a pattern instead of one value. --filter-code is a glob over the row code, and --filter-response a regular expression over the answer — both case-insensitive:
llmexer experiment export --pid llm-survey-2026 --filter-code 'S12_*'
llmexer experiment export --pid llm-survey-2026 --filter-response '"relevant":\s*true'
The glob has to cover the whole code, so write S12_* rather than S12. The regular expression is searched anywhere in the stored answer (filter no yer run rows - --filter-response '^$').
10. Compress the database (optional)
A finished database is easier to share or keep once it is packed. The archive is written next to the database under the same name, and the database itself stays where it is:
llmexer experiment compact --pid llm-survey-2026 --file experiment_<SAMPLE>.db
P.S. This option is just for convenience. You can achieve the same results faster by using the archive program native to your operating system.
11. Analyse the results in a notebook (optional)
llmexer analysis init --pid llm-survey-2026
This creates an analysis/ folder with two notebooks and the Python modules they call. Open analyse_experiment.ipynb and run all cells: it loads the experiment database, parses each model answer from JSON into its own columns, exports those answers as a CSV, and prints the statistics and charts. analyse_searches.ipynb does the same for one search.
The modules are copies, so each project can grow its own analysis. The notebooks import only those copies and never llmexer, so the folder stands on its own. To restore the shipped versions, run llmexer analysis init --rewrite; your copies are backed up first.
Running the notebooks needs the optional analysis packages:
uv pip install -e . --group analysis
💡 The CLI has many more options than this guide shows. Run
llmexer --help, orllmexer <category> <command> --help, to see them all.
✏️ CLI UI
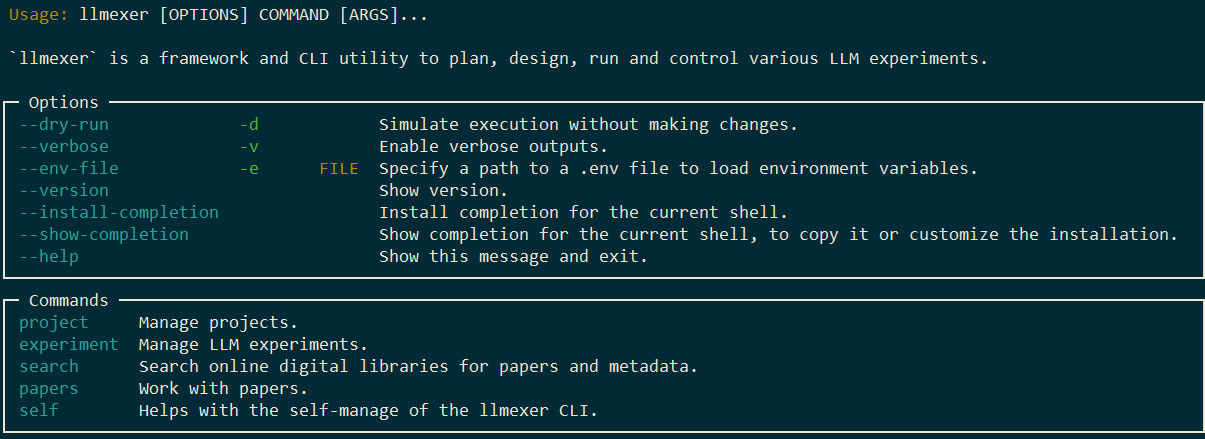
An overview of the CLI:
llmexer --help
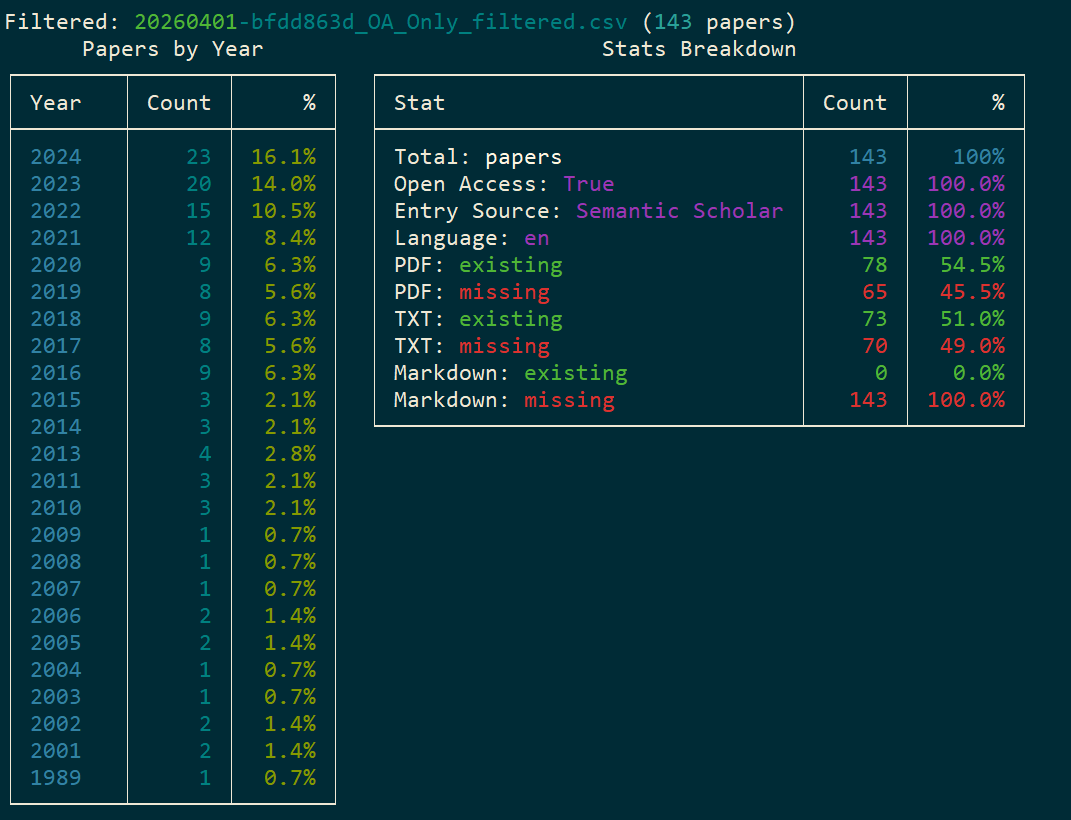
The statistics of a search, shown in the terminal:
llmexer search stats --file <filename>
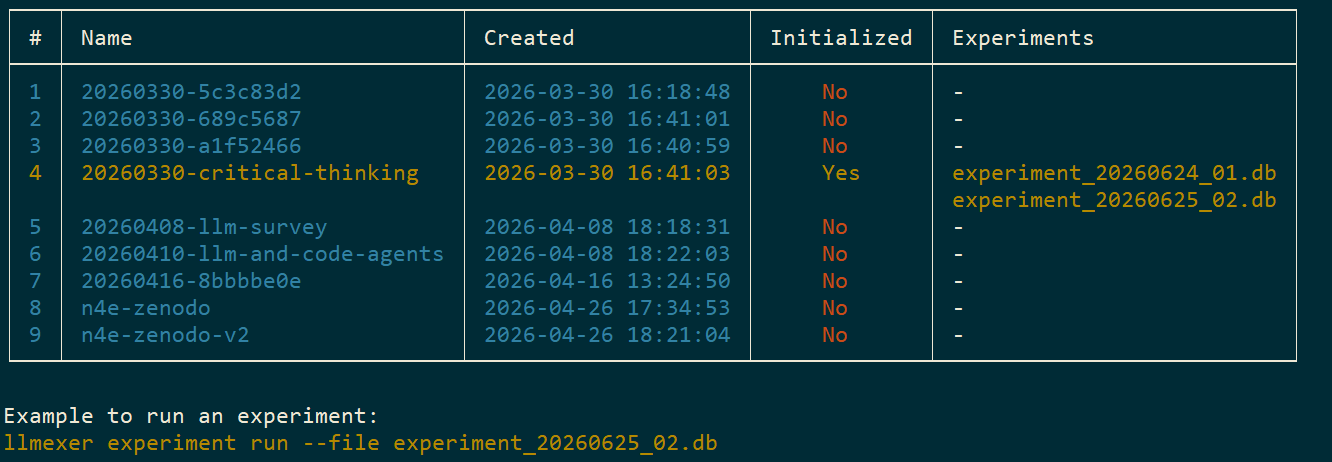
Your projects, with the current one highlighted:
llmexer experiment list
Search results exported as a static HTML page, which makes screening easier (shown in darkmode):
llmexer search export

Experiment results exported as a static HTML page (filtered by provider), which makes screening easier:
llmexer experiment export --filter-provider litellm
💡 Additional: Rename PDFs with pdf-renamer
Before you add papers to a project, you can rename them by their bibliographic metadata — year, journal, authors and title — with the external pdf-renamer tool. You do not need to install it; run it with uvx.
Rename as year, authors, title:
uvx --from pdf-renamer pdfrenamer -f "{YYYY}_{A3etal}_{T}" /path/to/pdfs
Include subdirectories:
uvx --from pdf-renamer pdfrenamer /path/to/pdfs -sf
💡 Additional: Extract BibTeX
You can also extract the BibTeX entry of a publication:
uvx --from pdf2bib pdf2bib -s bibtex.bib /path/to/pdfs
📢 Scenario 1: Add papers to a project
From a local file:
llmexer papers add --pid llm-survey-2026 --file ~/Downloads/attention-is-all-you-need.pdf
From a directory of PDFs:
llmexer papers add --pid llm-survey-2026 --directory ~/Downloads/papers/
From a URL:
llmexer papers add --pid llm-survey-2026 --url https://arxiv.org/pdf/1706.03762
📢 Scenario 2: Collect data by running a literature search
1. Run a search
Create a search configuration, then run it:
llmexer search create --pid llm-survey-2026 --query "large language models"
llmexer search list --pid llm-survey-2026
llmexer search run --pid llm-survey-2026 --file 20260401-bfdd863d.yaml
Or run a query directly:
llmexer search run --pid llm-survey-2026 --query "large language models" --limit 500
Results are saved as <ID>__results.csv in searches/.
2. Filter out rows you do not need (optional)
filter removes rows and writes <ID>__filtered.csv. Filters chain: each run reads the existing filtered file, or the results file if there is none, and rewrites it. You can combine --language, --source, --doi and --downloaded in one run:
# drop German rows, and rows that are not downloaded yet
llmexer search filter --pid llm-survey-2026 --file 20260401-bfdd863d.yaml --language de --downloaded
Leave out --file to apply the same filters to every search in the project. Each applied filter is logged, so you can see later what was removed.
3. Export search results as HTML (optional)
llmexer search export --pid llm-survey-2026 --file 20260401-bfdd863d.yaml
This writes an HTML page next to the CSV, with sortable columns, per-column filters, clickable DOIs and collapsible abstracts. Leave out --file to export every search.
📢 Scenario 3: Download papers and extract their text
1. Download open-access papers by DOI
llmexer uses the Unpaywall API, which needs your email address:
llmexer papers download --pid llm-survey-2026 --doi 10.1038/nature12373 --email you@example.com
You can also download every paper with a DOI from a search result file:
llmexer papers download --pid llm-survey-2026 --search-file 20260401-bfdd863d__results.csv
Or from a filtered file, to download only the papers that passed your filters:
llmexer papers download --pid llm-survey-2026 --search-file 20260401-bfdd863d__filtered.csv
Failed downloads are written to a CSV in searches/logs/, so you can retry them. When the download finishes, the search is synced against your papers/ folder: the listed rows are updated, and no new rows are added.
2. Extract text from the papers
The default pypdf backend saves .txt files:
llmexer papers extract --pid llm-survey-2026
The docling backend gives richer Markdown output and saves .md files. It reads its connection details from .env:
llmexer papers extract --pid llm-survey-2026 --processor docling
You can also pass those details directly:
llmexer papers extract --pid llm-survey-2026 --processor docling \
  --docling-url http://myserver:5001/ \
  --docling-user admin \
  --docling-password secret
Papers that already have an extracted file are skipped. Use --rewrite to extract them again:
llmexer papers extract --pid llm-survey-2026 --rewrite
📢 Scenario 4: More ways to run an experiment
1. Preview a run without calling any LLM
llmexer --dry-run experiment run --pid llm-survey-2026
2. Run the rows of one provider
This helps when only one backend is available, such as a local ollama:
llmexer experiment run --pid llm-survey-2026 --filter-provider ollama
3. Run one model or one profile
Both names must match in full, and they are case-sensitive:
llmexer experiment run --pid llm-survey-2026 --filter-model gemma4:31b
llmexer experiment run --pid llm-survey-2026 --filter-profile ollama-creative
You can also combine the filters:
llmexer experiment run --pid llm-survey-2026 --filter-provider ollama --filter-model gemma4:31b
4. Run a single row by its code
llmexer experiment run --pid llm-survey-2026 \
  --file experiment_<SAMPLE>.db --code 1
5. Run several LLM calls at once
Most of a run is spent waiting for the backend, so --parallel-calls lets several calls run at the same time. The limit applies across all providers, and the default is 1, which runs the rows one after another. Results are always written one at a time.
llmexer experiment run --pid llm-survey-2026 --parallel-calls 4
Working with the current project
Most commands take a --pid option to say which project to use. If you set PROJECT_ID in your .env file, you can leave it out:
# in .env
PROJECT_ID=my-project

# uses my-project
llmexer search run --query "machine learning"
Pass --pid to override it for a single command:
llmexer search run --pid different-project --query "deep learning"
🗂️ CLI category: project
A project is the top-level container for your experiments, papers and searches. The project category (alias: proj) manages them.
| Command | What it does | Example |
|---|---|---|
create |
Creates a project folder under .projects/. Takes an optional custom ID. |
llmexer project create --id my-project |
current |
Shows the current project ID from .env. |
llmexer project current |
list |
Lists every project under .projects/ with the parts it holds (search, experiment, analysis, papers) and its creation date. Supports --sort-by and --desc. |
llmexer project list --sort-by date |
rename |
Renames a project. Uses PROJECT_ID from .env if you leave out --old-id. |
llmexer project rename --old-id old-name --new-id new-name |
🧪 CLI category: experiment
The experiment category (alias: exp) sets up, generates and runs the experiments inside a project.
| Command | What it does | Example |
|---|---|---|
init |
Creates the experiment/ folder with template CSVs and a starter prompt. Stops if the project is already set up. |
llmexer experiment init --pid my-project |
copy-papers |
Copies the extracted text of your papers into data.csv, one row per paper. Backs up the old file first. |
llmexer experiment copy-papers --pid my-project |
copy-search |
Copies a search result CSV into data.csv as ID;Title;Abstract;year;doi;authors, keeping the original row order. Backs up the old file first. |
llmexer experiment copy-search --pid my-project --file <SEARCH_ID>__results.csv |
map |
Rebuilds mapping.csv by pairing every data row with the prompts you select. Use --prompt to pick them, or leave it out to use all of them. An unknown prompt name stops the command. Backs up the old file first. Supports --dry-run. |
llmexer experiment map --pid my-project --prompt prompt01,prompt02 |
generate |
Renders every combination of data row, prompt, model and parameter profile into a new SQLite database. A model without a matching profile is skipped, and a repeated combination stops the command before anything is written. Supports --dry-run. |
llmexer experiment generate --pid my-project |
update |
Appends new combinations to an existing database instead of generating a new one. Stored rows and their results stay as they are. A profile whose values changed under the same name stops the command; rename the profile and run it again. Supports --dry-run and --file. |
llmexer experiment update --pid my-project |
try |
Renders and runs one combination of data row, prompt and profile, then prints the answer. All three names are checked first, so a typo stops the command before any LLM call. Each try is kept as history, with the parameters it used. With no generated database the try warns and still runs, storing only the response file. --suggest prints one randomly chosen combination as a ready command and runs nothing. Supports --dry-run. |
llmexer experiment try --pid my-project --prompt prompt01 --profile ollama-default --data-id D01 |
fix |
Rewrites the stored answers, one named fix per run. As long as it directly modifies and saves database file, it could take while for a big database to get fixed (e.g., 3.5K rows in a minutes could be fixed). a Option --ensure-json-format repairs an answer that holds JSON wrapped in a fence or followed by an explanation, so the whole cell parses as JSON again. Option --rename-json-field OLD NEW renames a top-level field of that JSON, for a prompt whose wording changed after part of the experiment had run (first runs with --ensure-json-format). Every change is logged in the datafix_logs. Nothing is written unless you pass --apply (without it, --test N shows how many proposed changes could be fixed). Supports --file and --dry-run. |
llmexer experiment fix --pid my-project --ensure-json-format --apply |
run |
Runs every row of a generated database against its provider and writes the results back into the same database. Rows that already finished are skipped. Narrow the run with --filter-provider, --filter-model, --filter-profile or --code, and raise the throughput with --parallel-calls. Supports --dry-run and --file. |
llmexer experiment run --pid my-project --filter-provider ollama |
stats |
Shows the totals, token counts, and a breakdown per provider and per model. The same model served by two providers is reported once per provider. Pass --file to pick a database. |
llmexer experiment stats --pid my-project |
view |
Shows the setup files of an experiment as tables (alias: show). --params shows llm-params.csv - one table per provider, --llms shows llms-for-experiment.csv. --data shows the counts related to data files. |
llmexer experiment view --pid my-project --llms |
list |
Lists all projects with their setup state and their experiment databases. Sort with --sort-by and --desc. |
llmexer experiment list --sort-by date --desc |
export |
Renders an experiment database as an HTML page next to it, with sortable columns, per-column filters and a ready-to-run try command per row. Narrow it with --filter-provider, --filter-model or --filter-profile, and with the export-only patterns --filter-code (glob over the code) and --filter-response (regular expression over the answer); each filter is added to the file name. Supports --file, --rewrite and --dry-run. |
llmexer experiment export --pid my-project --filter-provider ollama |
compact |
Compresses an experiment database into a .7z archive next to it, under the same name. The database is left in place. Supports --file, --rewrite and --dry-run. |
llmexer experiment compact --pid my-project |
📊 CLI category: analysis
The analysis category (aliases: analyse, analyze) sets up a Jupyter workspace for a project. It creates an analysis/ folder next to experiment/, papers/ and searches/, holding two notebooks and the Python modules they call.
The notebooks hold no logic of their own — the cells set the paths, call functions and show the result — so the analysis itself stays testable code. The modules are copies, and the notebooks import only them, never llmexer. That keeps the folder self-contained and lets you adapt it per project.
| Command | What it does | Example |
|---|---|---|
init |
Creates <project>/analysis/ with analyse_experiment.ipynb, analyse_searches.ipynb and the modules they call. The experiment notebook loads the database, parses each answer from JSON into columns, exports them as a CSV, and prints the statistics and charts. The searches notebook breaks one search down by engine, year, open access and language. Both work on an empty project. Existing files are only replaced with --rewrite, which backs them up first. Supports --dry-run. |
llmexer analysis init --pid my-project |
add-agreement |
Adds analyse_experiment_agreements.ipynb, which reads the flattened CSV the experiment notebook writes and reports Cohen’s kappa for every pair of profiles, one row per prompt and yes/no field. Each prompt is scored on its own (prompt_id is the set, data_id the item), and the notebook’s INTERMEDIATE_VALUES_DIR can write the rows behind every kappa to CSV for checking by hand. Name the fields with --fields, or leave --autodetect-fields on to have the notebook find them. The modules it calls are copied alongside, so it also works without init. Existing files are only replaced with --rewrite, which backs them up first. Supports --dry-run. |
llmexer analysis add-agreement --pid my-project |
The notebooks read their database and search files set in the moment, when the folder is created, so you can edit them by hand. They do not refresh themselves: after another experiment generate or search run, change the value or run init --rewrite.
Running the notebooks needs the optional analysis packages dependencies:
uv pip install -e . --group analysis
📑 CLI category: papers
The papers category manages the PDFs of a project.
| Command | What it does | Example |
|---|---|---|
add --file |
Copies one PDF into the project’s papers/ folder. |
llmexer papers add --file /path/to/paper.pdf |
add --directory |
Copies every PDF from a directory and its subdirectories. Papers already in the project are skipped. | llmexer papers add --directory /path/to/folder |
add --url |
Downloads a PDF from a URL. | llmexer papers add --url https://example.com/paper.pdf |
download --doi |
Downloads open-access PDFs by DOI through the Unpaywall API. Needs your email, from --email or UNPAYWALL_EMAIL. |
llmexer papers download --doi 10.1038/nature12373 --email you@example.com |
download --search-file |
Downloads every paper with a DOI from a search result or filtered CSV, then syncs the search against papers/. Failures are logged so you can retry them. |
llmexer papers download --search-file 20260401-abc123__filtered.csv |
extract |
Extracts the text of every PDF in papers/. The default pypdf backend saves .txt; the docling backend saves .md. Already extracted files are skipped unless you pass --rewrite. |
llmexer papers extract --pid my-project --processor docling |
🔍 CLI category: search
The search category manages and runs literature searches. search run queries the Semantic Scholar bulk API. If you set OPENALEX_API_KEY, it then queries the OpenAlex Works API as a second engine and keeps only the publications Semantic Scholar did not already return, matched by DOI or by title. Without the key, OpenAlex is skipped.
| Command | What it does | Example |
|---|---|---|
create |
Creates a search configuration file in the project’s searches/ folder. |
llmexer search create --query "machine learning" |
list |
Lists the search configurations of a project as a table. | llmexer search list --pid my-project |
run --query |
Runs a search from a query string and saves the results as a CSV in searches/. |
llmexer search run --query "neural networks" --limit 200 |
run --file |
Runs a search from a configuration file. Use --rewrite to replace existing result files. |
llmexer search run --file 20260401-abc123.yaml |
rename |
Renames a search and all the files that belong to it. | llmexer search rename --old-id 20260401-abc123 --new-id my-search |
stats |
Shows the statistics of a search: papers per year, plus a breakdown by open access, language, download state and source. | llmexer search stats --file 20260401-abc123.yaml |
filter |
Removes rows from a search and rewrites its filtered CSV. Filters chain, and you can combine --language, --source, --doi and --downloaded. Leave out --file to filter every search. Each applied filter is logged. |
llmexer search filter --file 20260401-abc123.yaml --language de --downloaded |
merge |
Merges the project’s search CSVs into one deduplicated results file and one deduplicated filtered file, marking which search each row came from and how often it was found. Supports --rewrite and --dry-run. |
llmexer search merge --pid my-project |
sync |
Reconciles a search against the project’s papers/ folder and updates which files each row has. Pass --add-local-extra-pdfs to also list PDFs that no row mentions yet. Leave out --file to sync every search. Supports --dry-run. |
llmexer search sync --file 20260401-abc123.yaml |
export |
Renders search results as an HTML page next to the CSV, with sortable columns, per-column filters, clickable DOIs and collapsible abstracts. Leave out --file and --csv-file to export the whole project. Supports --rewrite and --dry-run. |
llmexer search export --file 20260401-abc123.yaml |
To write more precise queries, see the API documentation of both engines:
- Semantic Scholar: Paper bulk search
- OpenAlex: Works
🔎 CLI category: self
The self category reports on the CLI itself.
| Command | What it does | Example |
|---|---|---|
version |
Prints the installed version. | llmexer self version |
envs |
Lists the environment variables llmexer uses, with passwords masked. |
llmexer self envs |
🧩 Development Setup
To work on llmexer itself, set it up locally with uv.
- Create a virtual environment:
uv venv - Activate it on macOS or Linux:
source .venv/bin/activateOr on Windows:
call .venv/Scripts/activate.bat - Install the package in editable mode with the
devdependencies. Editable mode (-e) is the key to development: it links thellmexercommand to your source code.uv pip install -e . --group devThe
devgroup also pulls in theanalysisgroup (matplotlib, seaborn, ipykernel, jupyterlab), so the notebooks run and their tests import cleanly. To install only what you need to run the notebooks:uv pip install -e . --group analysis